How to Deploy a Static Next.JS App with Dynamic Content
By Michael Hirsch | 3 min read


By Michael Hirsch | 3 min read
There is certainly no shortage in ways to get your Next.JS app deployed and on a server somewhere – so much so that it can be a bit overwhelming if you're just starting to research your best options (especially once you get into the AWS ecosystem). The solution we chose for our website here at Kickstart Crew is a combination of AWS Amplify and GraphCMS. Amplify makes it incredibly easy to get a static site up and running in minutes and I will go over how to do just that with you here. Before that let's go over the game plan. Our goal here is to take advantage of Next.JS for static site generation, use GraphCMS to populate the site with data at build time, and to have GraphCMS trigger new builds when content gets published or unpublished.
This article assumes you already have experience with Next.JS. I will not be going over how to create an app but rather how to take advantage of getStaticPaths and getStaticProps. We will use getStaticPaths to query if different pages are blog posts, or projects in our case, so that Next.JS knows what pages to generate. After it knows what pages to generate, Next.JS will call getStaticProps. This is where we will make our request to GraphCMS to get the data needed to populate each page. This is how it might look when adding getStaticPaths and getStaticProps to a dynamic page with the name [slug]. If you are using a different param, replace slug with your param in the following code.
export const getStaticPaths = async () => {
const apolloClient = initializeApollo()
const { data }: ProjectsQueryResults = await apolloClient.query({
query: GET_ALL_PROJECTS_QUERY,
})
const projects = data?.projects || []
return {
paths: projects.map(({ slug }) => ({ params: { slug } })),
fallback: false,
}
}
export const getStaticProps = async ({
params,
}: {
params: { slug: string }
}) => {
const apolloClient = initializeApollo()
const { data }: ProjectQueryResults = await apolloClient.query({
query: GET_PROJECT_QUERY,
variables: {
slug: params.slug,
},
})
const project = data?.project
return {
props: { project }
}
}
After this, you can now expect project (in our example) to be available to the page component in props and use it to populate your page with data.
At this point, your app should be consuming the correct data and using it to populate it's dynamic routes with content. Now we can test that it builds the static pages by making some modifications to your package.json. First, you will need to update your scripts to looks like the following:
"scripts": {
    "dev": "next",
    "build": "next build && next export",
    "prestart": "npm run build",
    "start": "serve out"
},
Now run either yarn add serve or npm i server --save to add serve as a dependency and you are good to go. All you need to do now is run npm start and it will build your static site and serve those file for you at http://localhost:5000.
Before we go further you will need to add a file to the root of your project called amplify.yml with the following contents:
version: 1
frontend:
    phases:
        preBuild:
            commands:
                - yarn install
        build:
            commands:
                - yarn run build
    artifacts:
        baseDirectory: out
        files:
            - '**/*'
    cache:
        paths:
            - node_modules/**/*
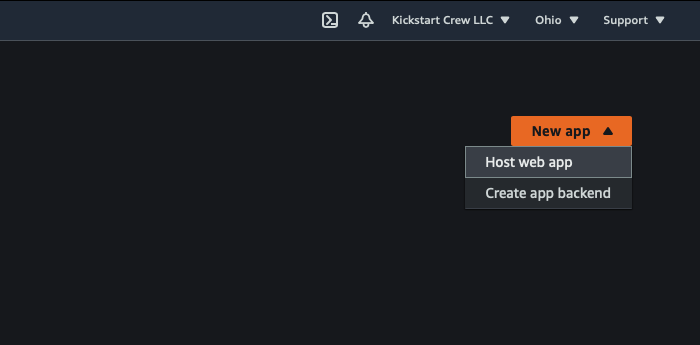
To get your new static site running on AWS Amplify you will first need an AWS account. For this tutorial I'm going to assume you already have an account. Login to AWS and go to AWS Amplify in the console. After you get to AWS Amplify, click "New app" and then "Host web app".
The last thing we need to do now is to set up our Next.JS app to build on AWS Amplify every time our dynamic data changes, so that our static site stays up to date. To do this with GraphCMS, you can go to the Webhooks page and create a webhook to trigger when any content you have on the website gets published or unpublished. After you create the webhook, copy the webhook url, go back to AWS Amplify, go to your app, click "Build Settings", scroll down to "Incoming webhooks", click "Create webhook", paste the webhook url, and select which branch you want built. After you do this, anytime you publish or unpublish content in your CMS, your site will rebuild on AWS Amplify and the changes will go live.
There you go! You now have a static Next.JS app with builds with dynamic data each time you make a change to the content. The build time is now the only thing to be aware of going forward as your dynamic data grows. For example, if it's a blog and you have a fast growing list of articles or you have an e-commerce site with a lot of products the slower the build time will be as it's generating the different static pages for all of the different content. I hope this was helpful. Please feel free to reach out on Twitter at @mikeahirsch if you have any questions.